

Overview
You can hand a service over to another customer yourself, from the Ascienth console at https://console.advinservers.com. The service keeps running, keeps its IP addresses and data, and its billing moves to the new owner’s account. You do not need to open a ticket, and you never have to share your password. It works through teams:- The seller (the current owner) creates a team, puts the service in it, and invites the buyer with a role that allows transfers.
- The buyer accepts the invitation and moves the service onto their own account.
A transfer is permanent. Once the service is on the buyer’s account, removing them from your team does not bring it back, and we cannot reverse it for you. Only give a buyer the transfer permission when you are ready for them to take the service.
What Can Be Transferred
Services are transferred one at a time. To hand over two servers, the buyer moves each one separately.
Requirements
Both of you need:- An account with us. The buyer must already have an account, either on the client area at https://clients.advinservers.com or on the Ascienth console, and give the seller its email address.
- Separate billing profiles in the same currency. The service keeps its price, so both accounts must bill in the same currency. If they do not, the transfer is refused.
A server must have...
A server must have...
- No unpaid invoices. Any unpaid, pending or overdue invoice for the server must be paid first. Invoices cannot move between accounts.
-
Nothing of the seller’s attached. Remove these first, from the page named:
- Nothing in progress. The server cannot be suspended, installing, restoring or being deleted, and it cannot have an upgrade in progress or be moving between nodes.
- Room on the buyer’s account for any floating IPs that go with it. Each account has a floating IP limit.
A floating IP must be...
A floating IP must be...
- Active, and detached from every server. To move a floating IP together with its server, transfer the server instead and select the IP in the dialog.
- Free of unpaid invoices.
- Within the buyer’s floating IP limit.
A snapshot storage must be...
A snapshot storage must be...
- Active, and not suspended or being cancelled.
- Free of unpaid invoices.
- Not in the middle of a resize, and not receiving a snapshot that is still being taken.
Privacy
You do not need to know each other’s real identity, but some account details are shown:- The buyer sees the seller’s account name and email address in the invitation and in the team.
- The seller sees the buyer’s account name and email address in the team’s member list.
For the Seller
1
Get the service ready
Check the requirements above. Pay any unpaid invoice for the service, and remove private networks, firewall groups, mounted ISOs and bandwidth blocks from a server.Then decide what you want to leave behind:
- Delete anything private from the server. The disk is handed over exactly as it is, including files, saved passwords and your SSH keys inside the operating system. Reinstalling the server first wipes it.
- Delete reverse DNS records you do not want the buyer to have. They go with the server.
- Snapshots stay with you. Snapshots of the server stay in your snapshot storage and can still be restored onto your other servers. Backups taken before the transfer are not available to the buyer.
2
Create a team for the sale
Click “Teams” in the left sidebar, then 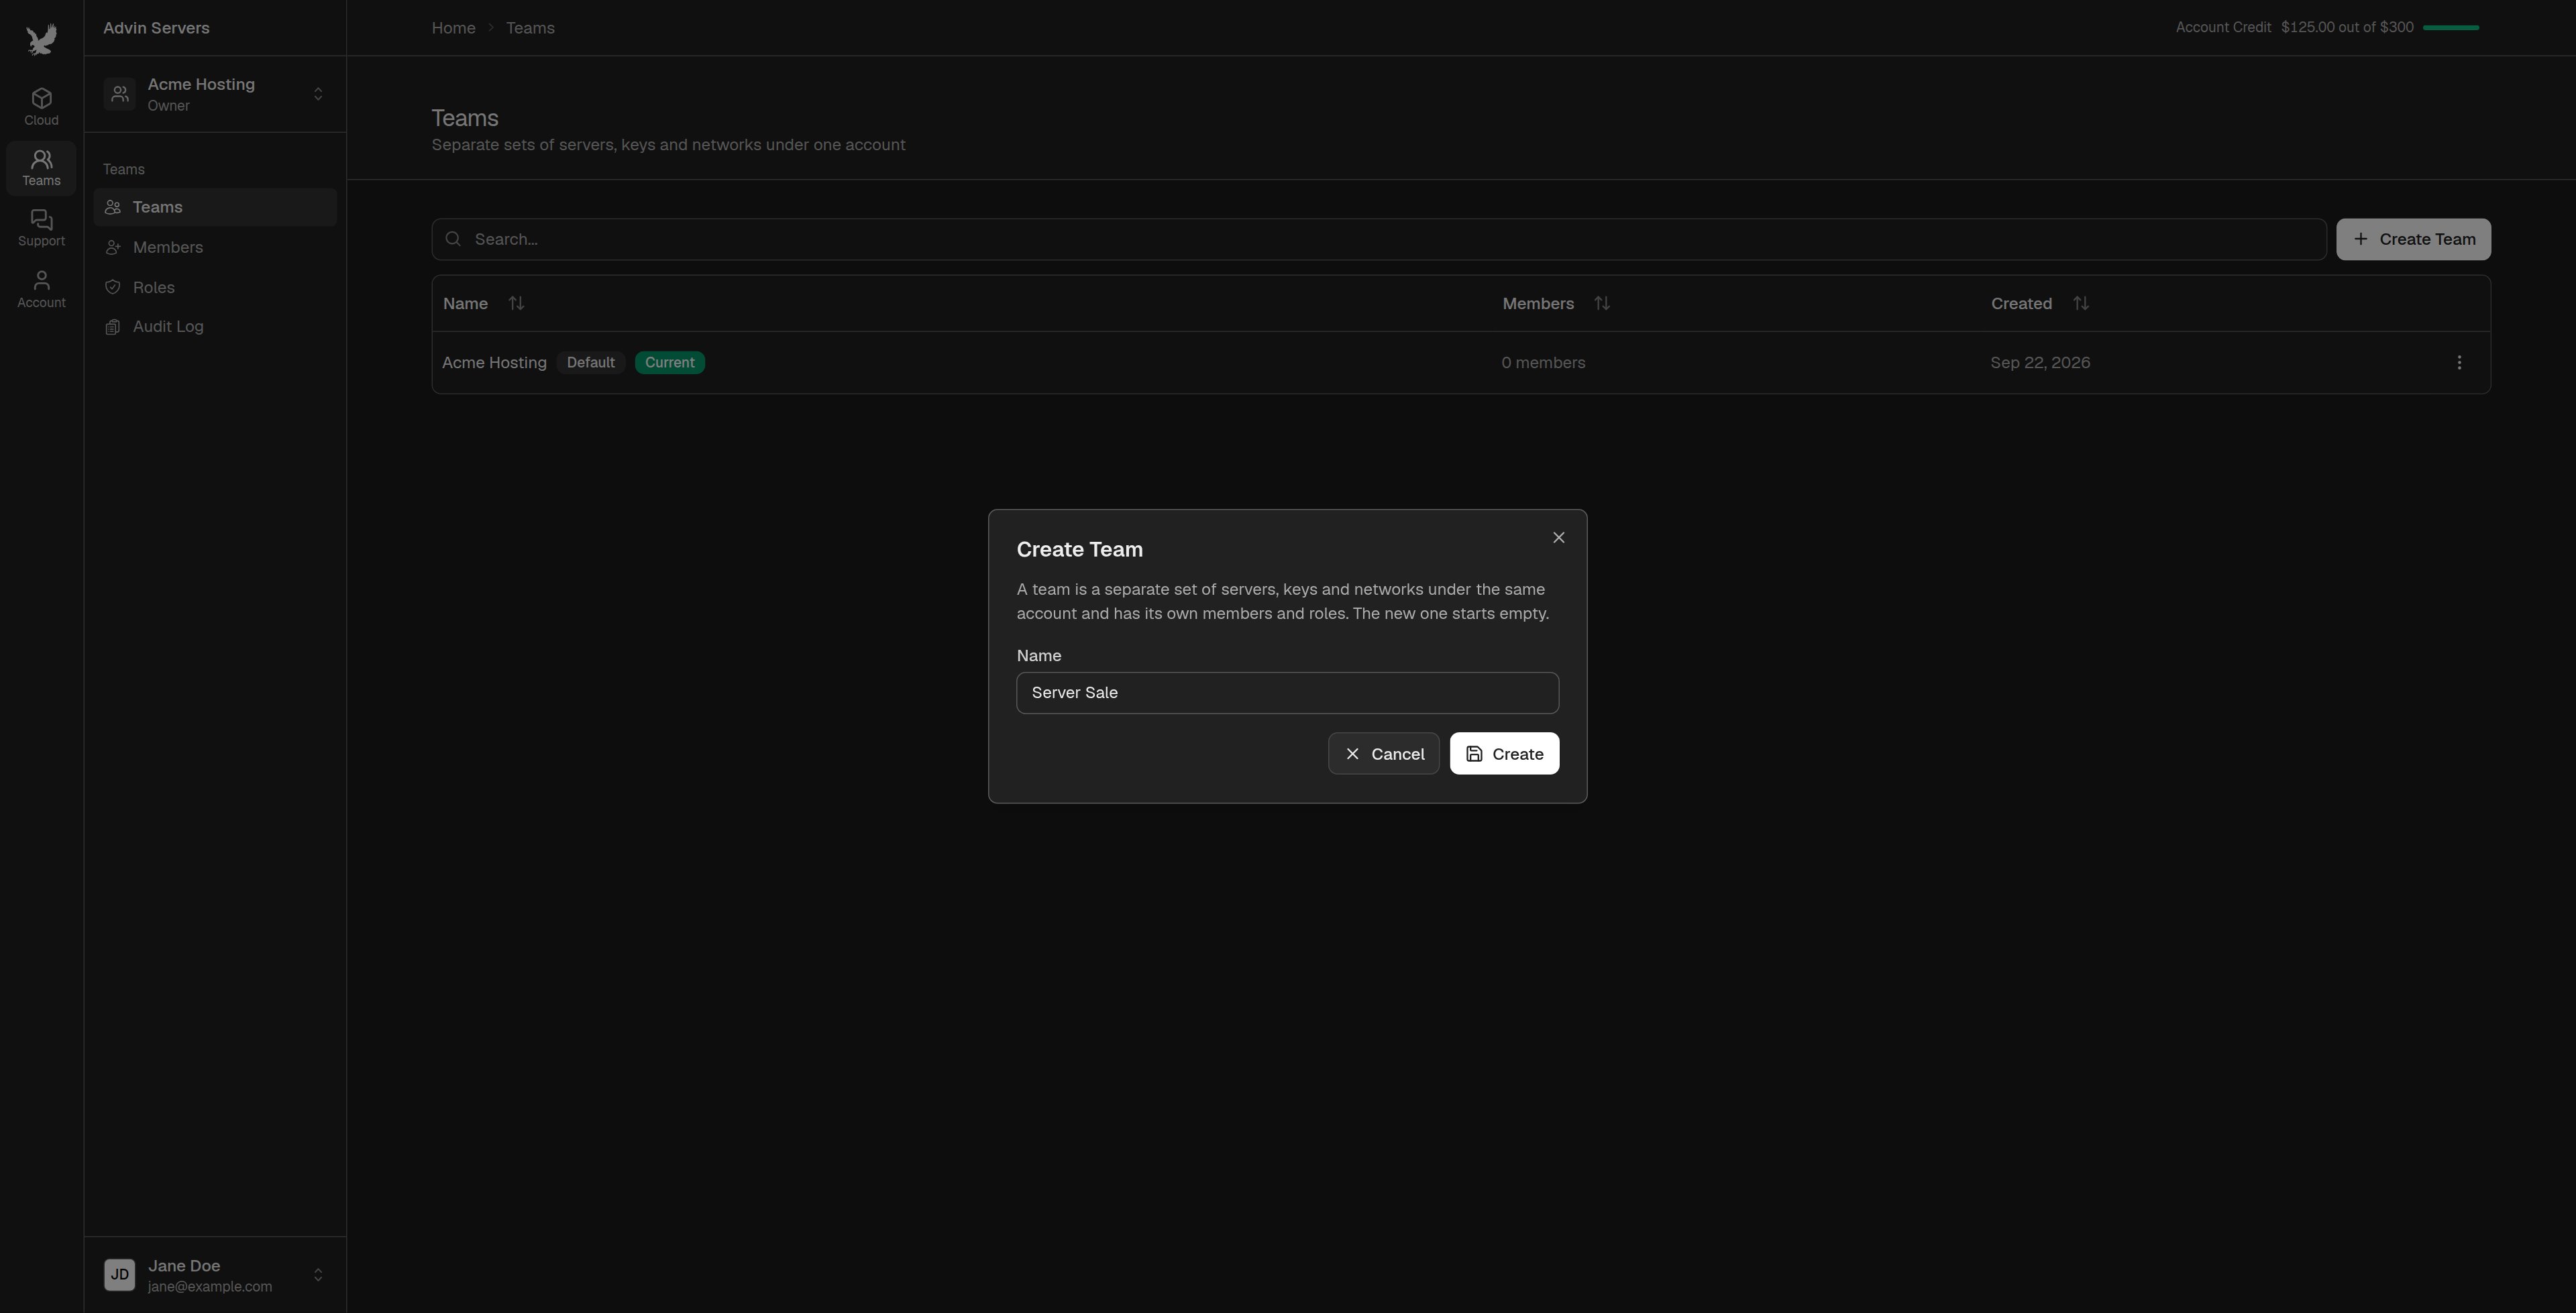
Create Team. Give it a name such as “Server Sale” and click Create.A separate team means the buyer can only see what you put in it. Do not invite a buyer to a team that holds your other servers.3
Move the service into the new team
Open the list the service is on (“Virtual Servers”, “Floating IPs” or “Snapshots”). Open the menu at the end of its row, choose 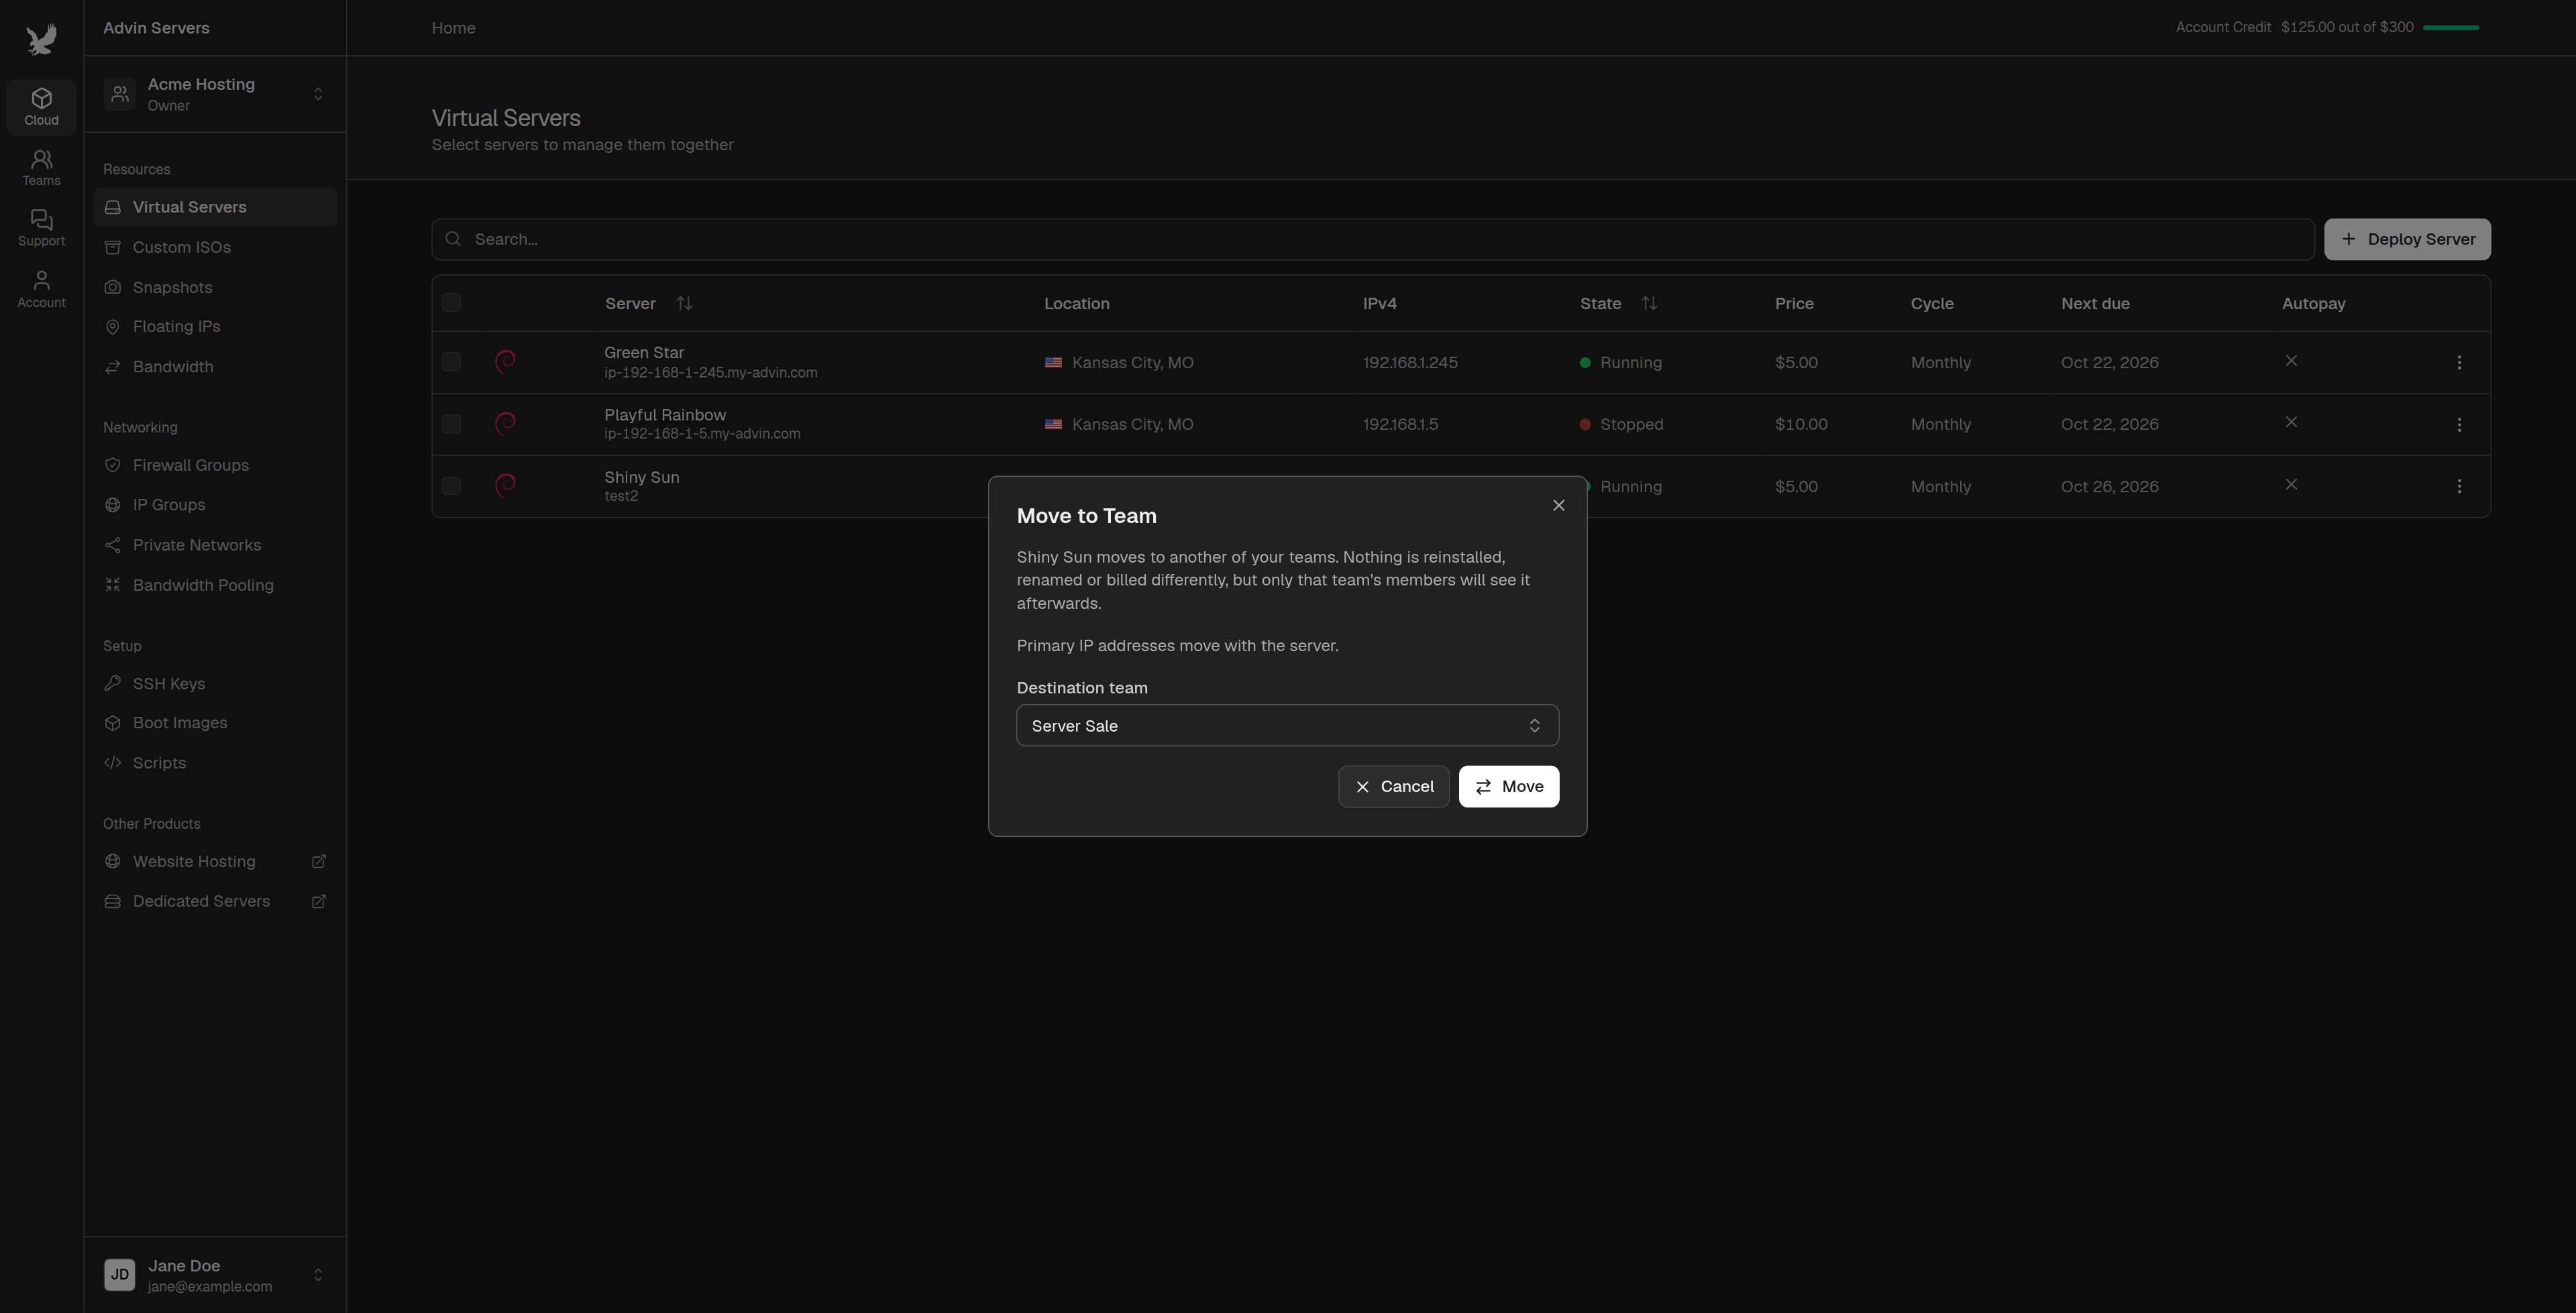
Move to team, pick the new team and click Move.This only changes which of your teams the service is in. Its billing and data do not change.4
Create a role that allows the transfer
Switch to the new team from the team menu at the top of the sidebar. Click “Roles”, then 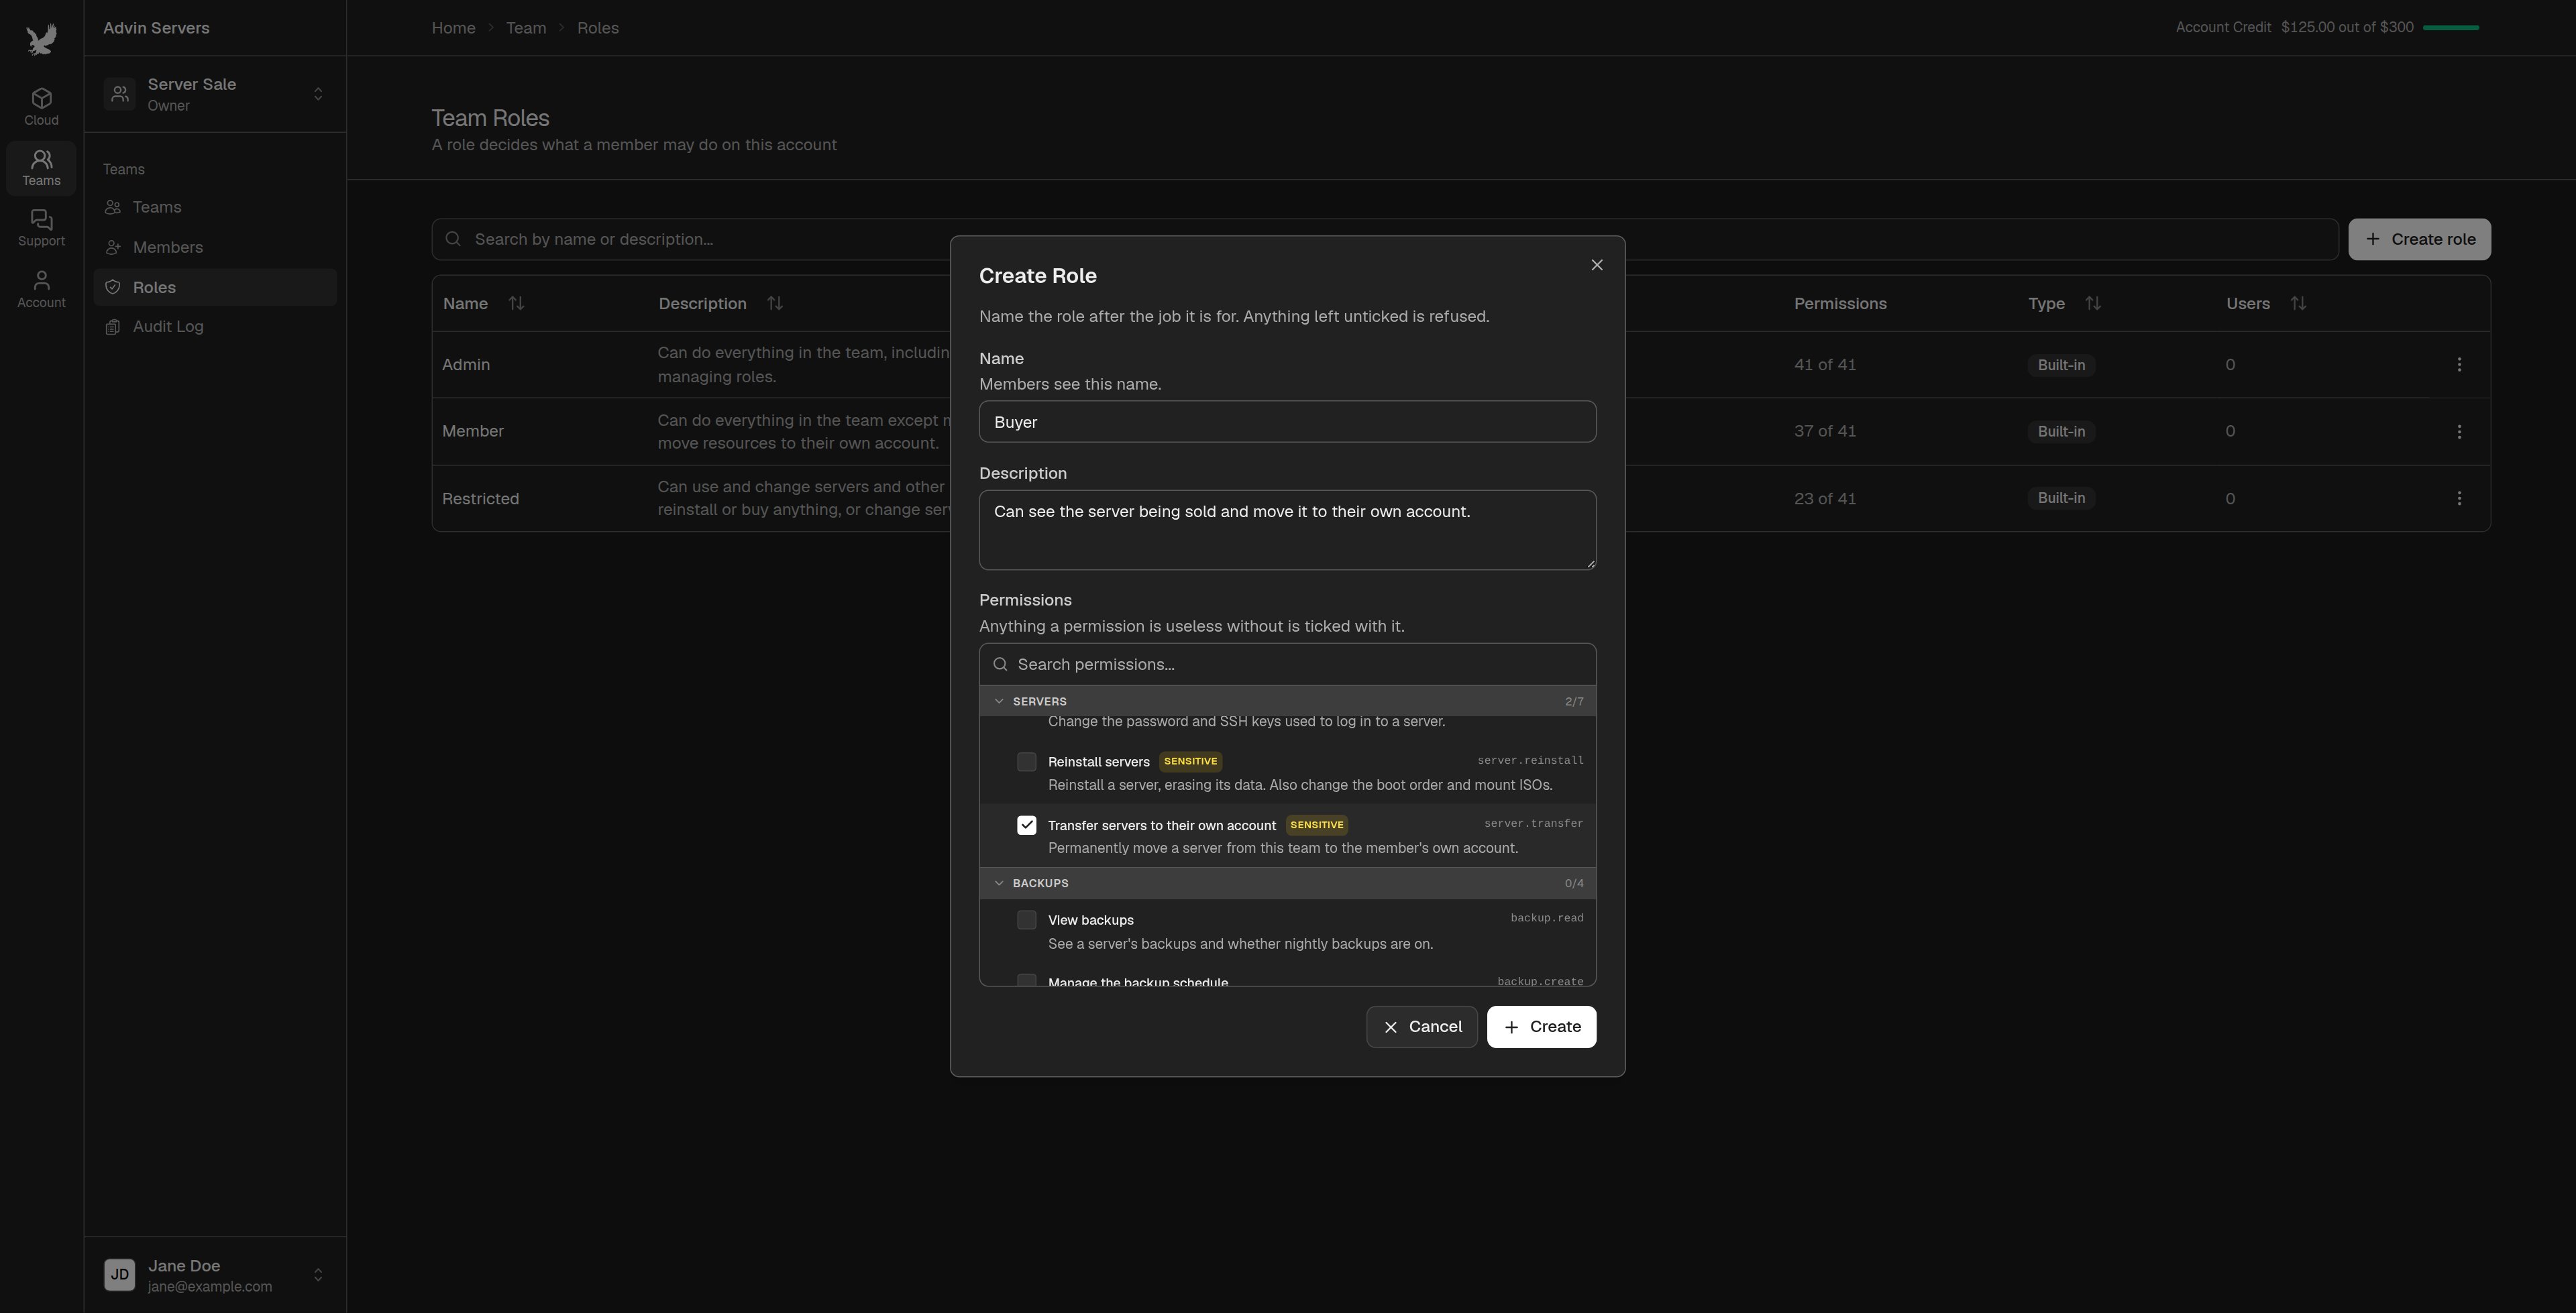
Create role.Name it “Buyer” and tick only the permission for what you are selling:The matching view permission is ticked for you, so the buyer can see the service. Leave everything else unticked. Click
Create.5
Invite the buyer
Click “Members”, then 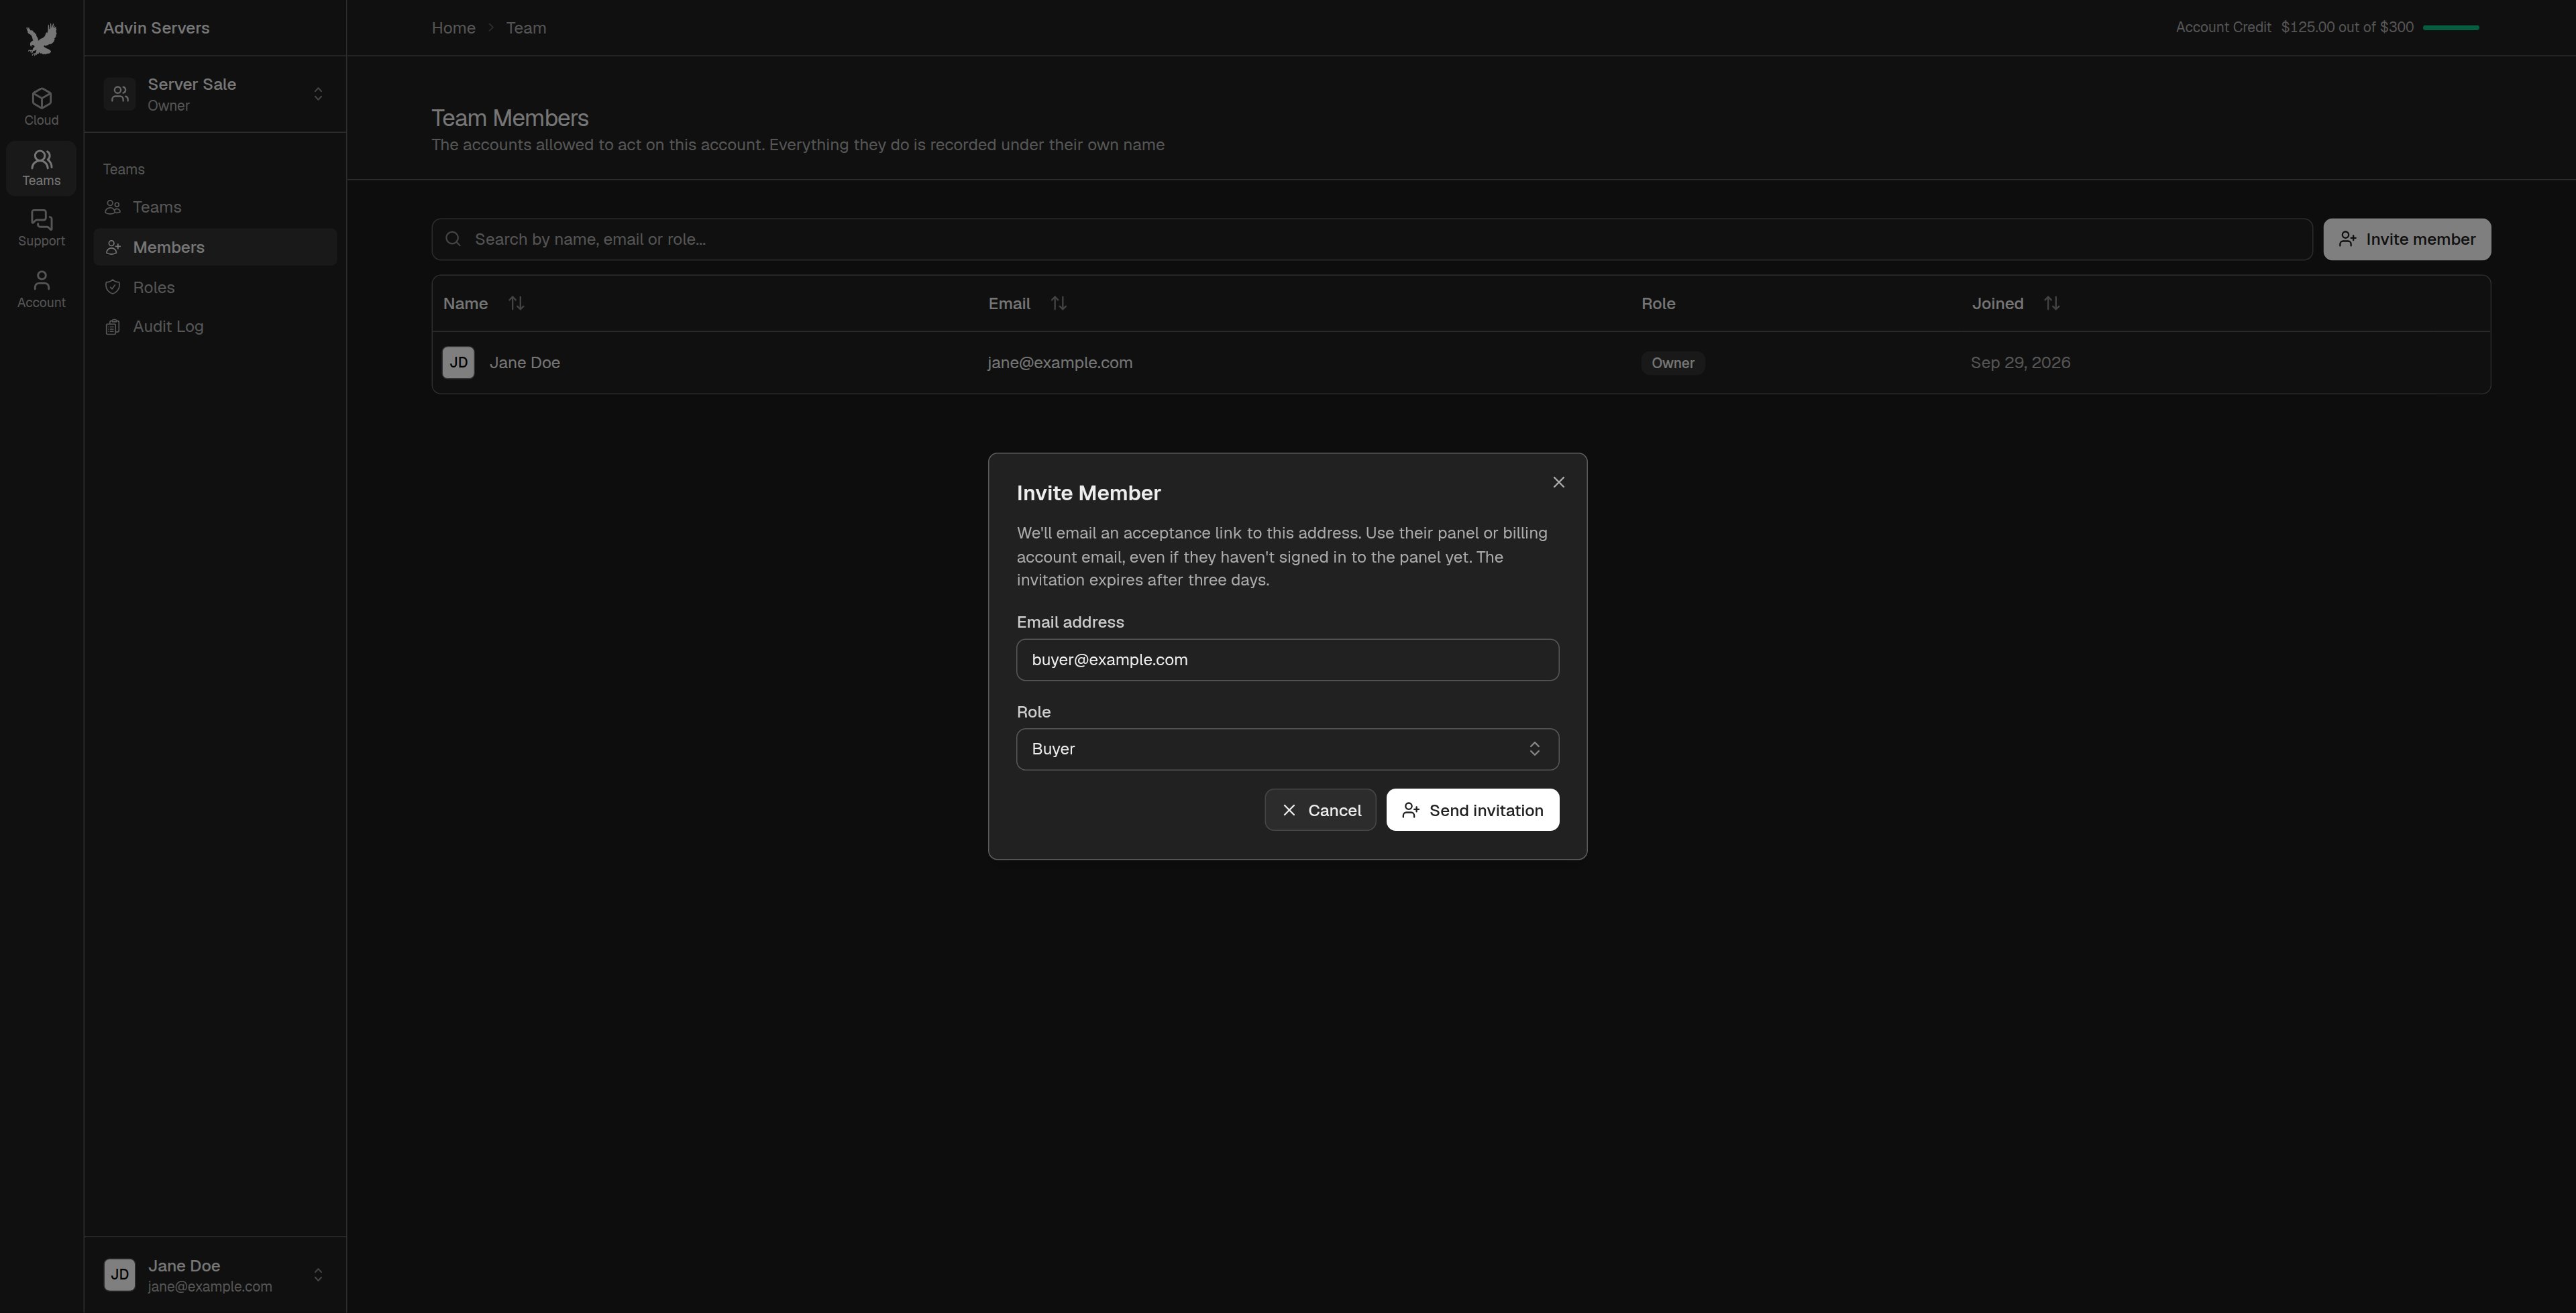
Invite member. Enter the email address of the buyer’s account, set Role to Buyer, and click Send invitation.6
Tidy up afterwards
Once the buyer has moved the service, it disappears from your account and its billing stops. Remove the buyer from the team from the “Members” page, then delete the team from the “Teams” page.
For the Buyer
1
Give the seller your account email
Send the seller the email address of your Advin Servers account. If you do not have an account yet, create one on the client area at https://clients.advinservers.com first.
2
Accept the invitation
Open the link in the invitation email and sign in. Check that the team and the person who invited you are who you expect, then accept. See Accepting an invitation.
3
Switch to the seller's team
Open the team menu at the top of the left sidebar and pick the seller’s team. Your role in it is shown next to its name.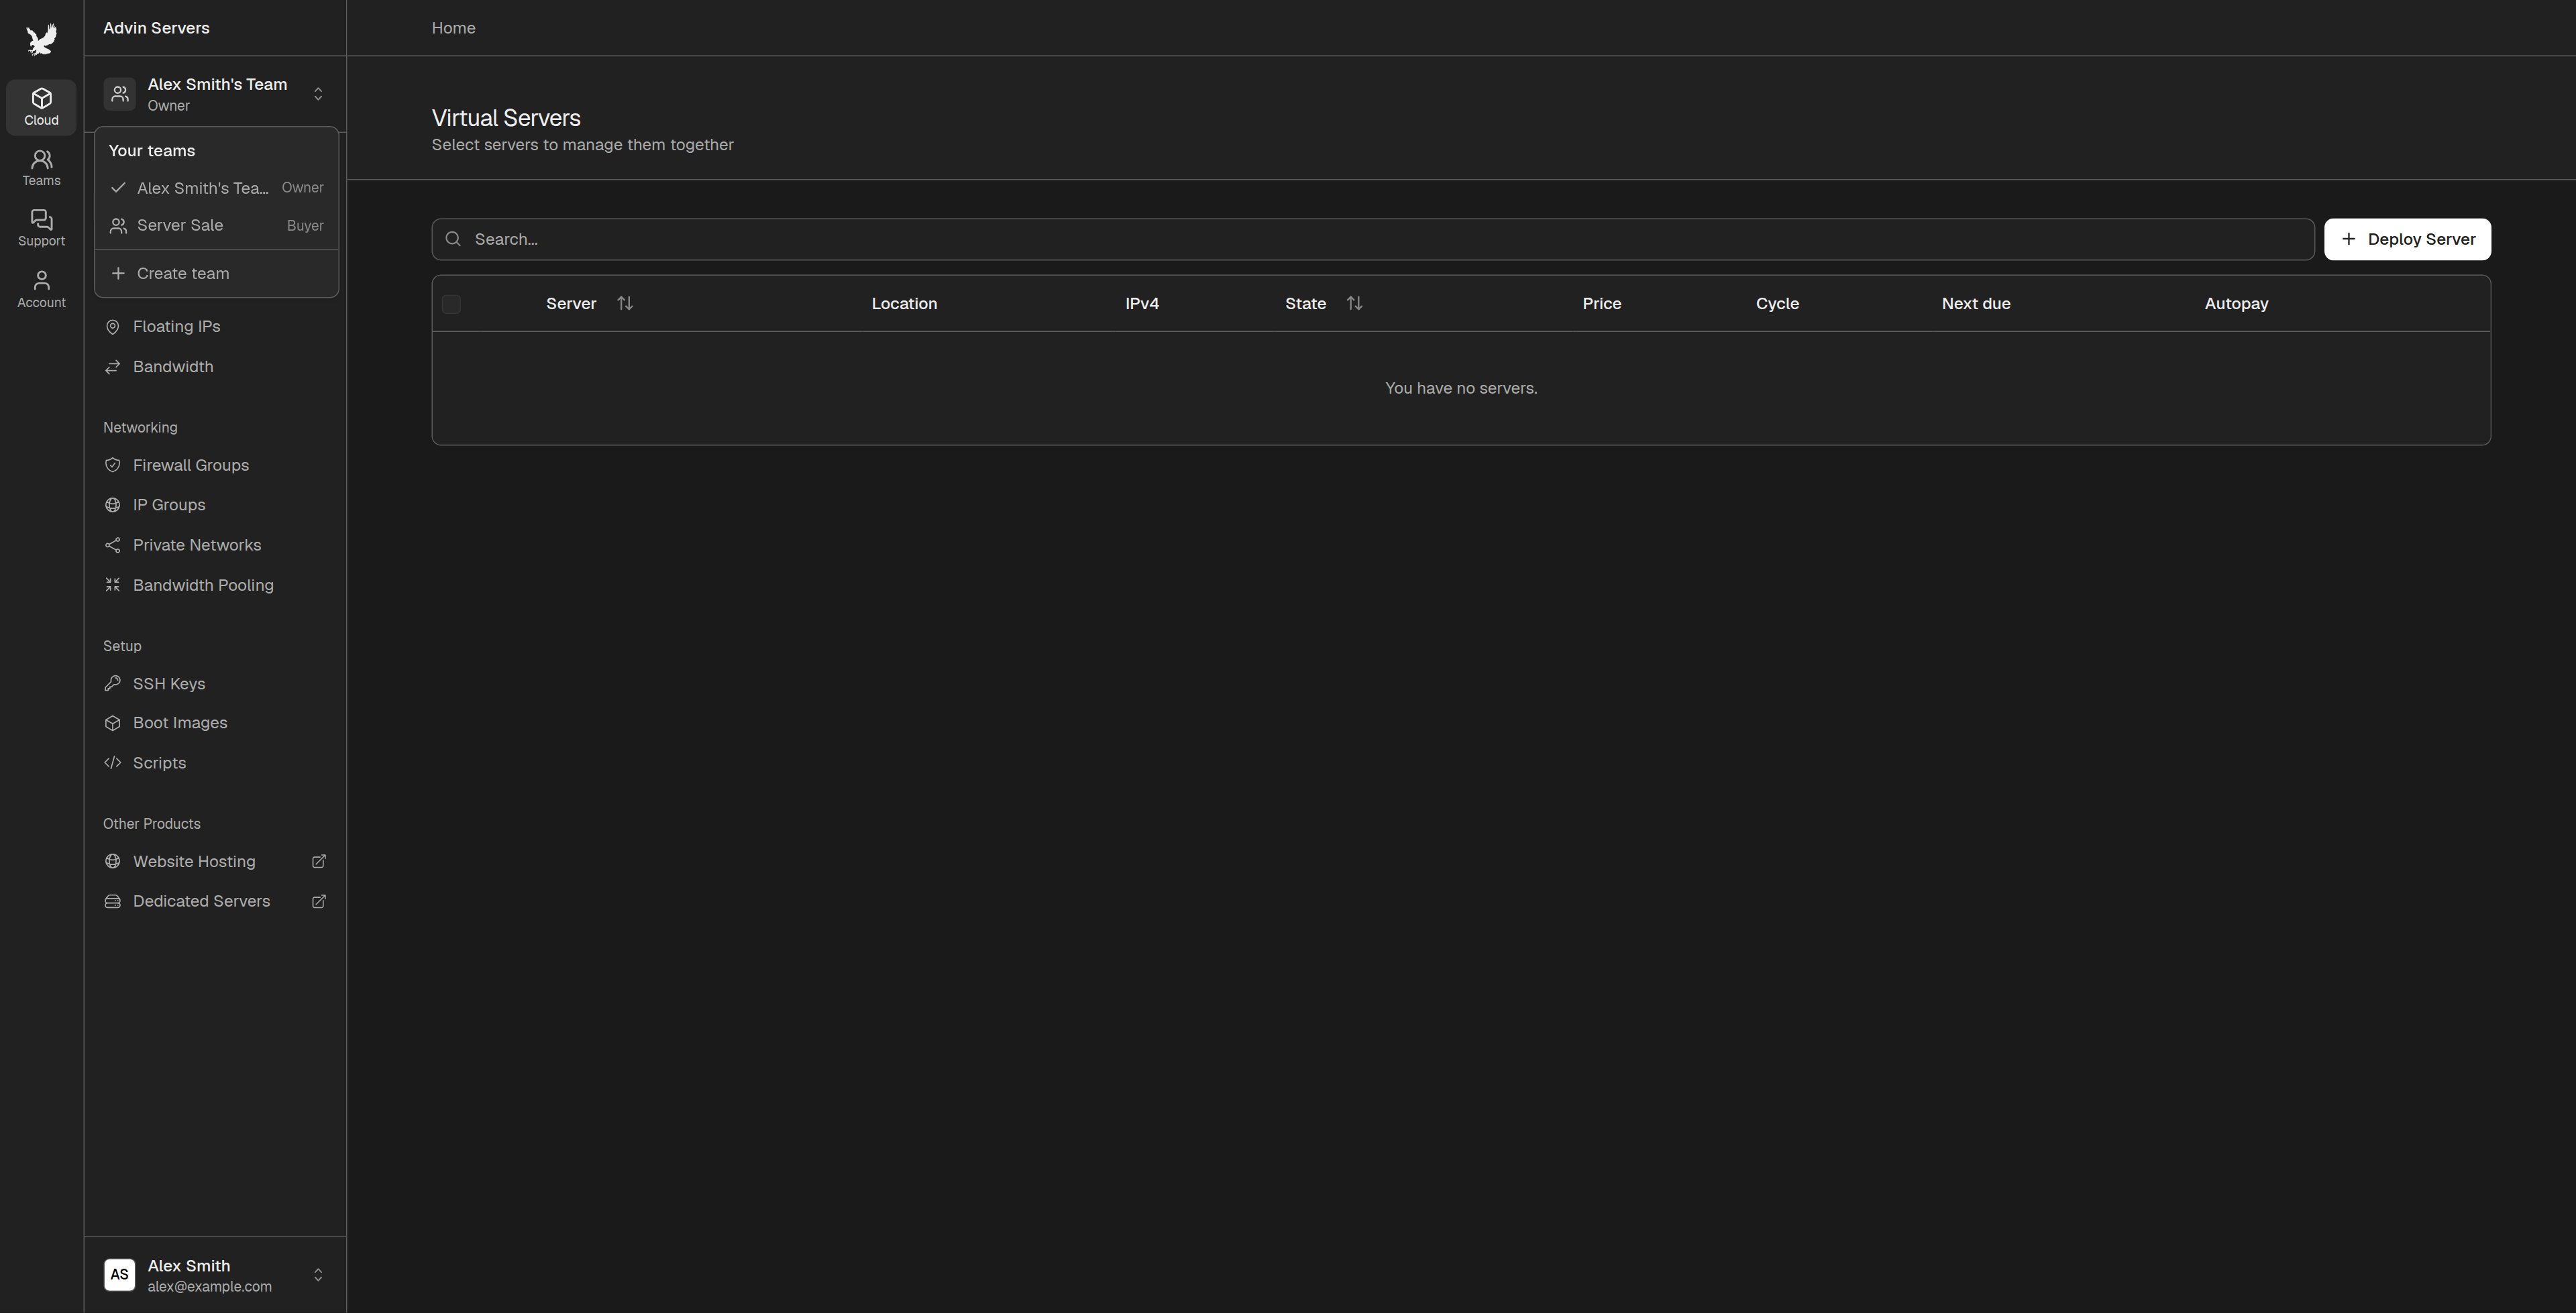
4
Move the service to your account
Open the list the service is on (“Virtual Servers”, “Floating IPs” or “Snapshots”). Open the menu at the end of its row and choose 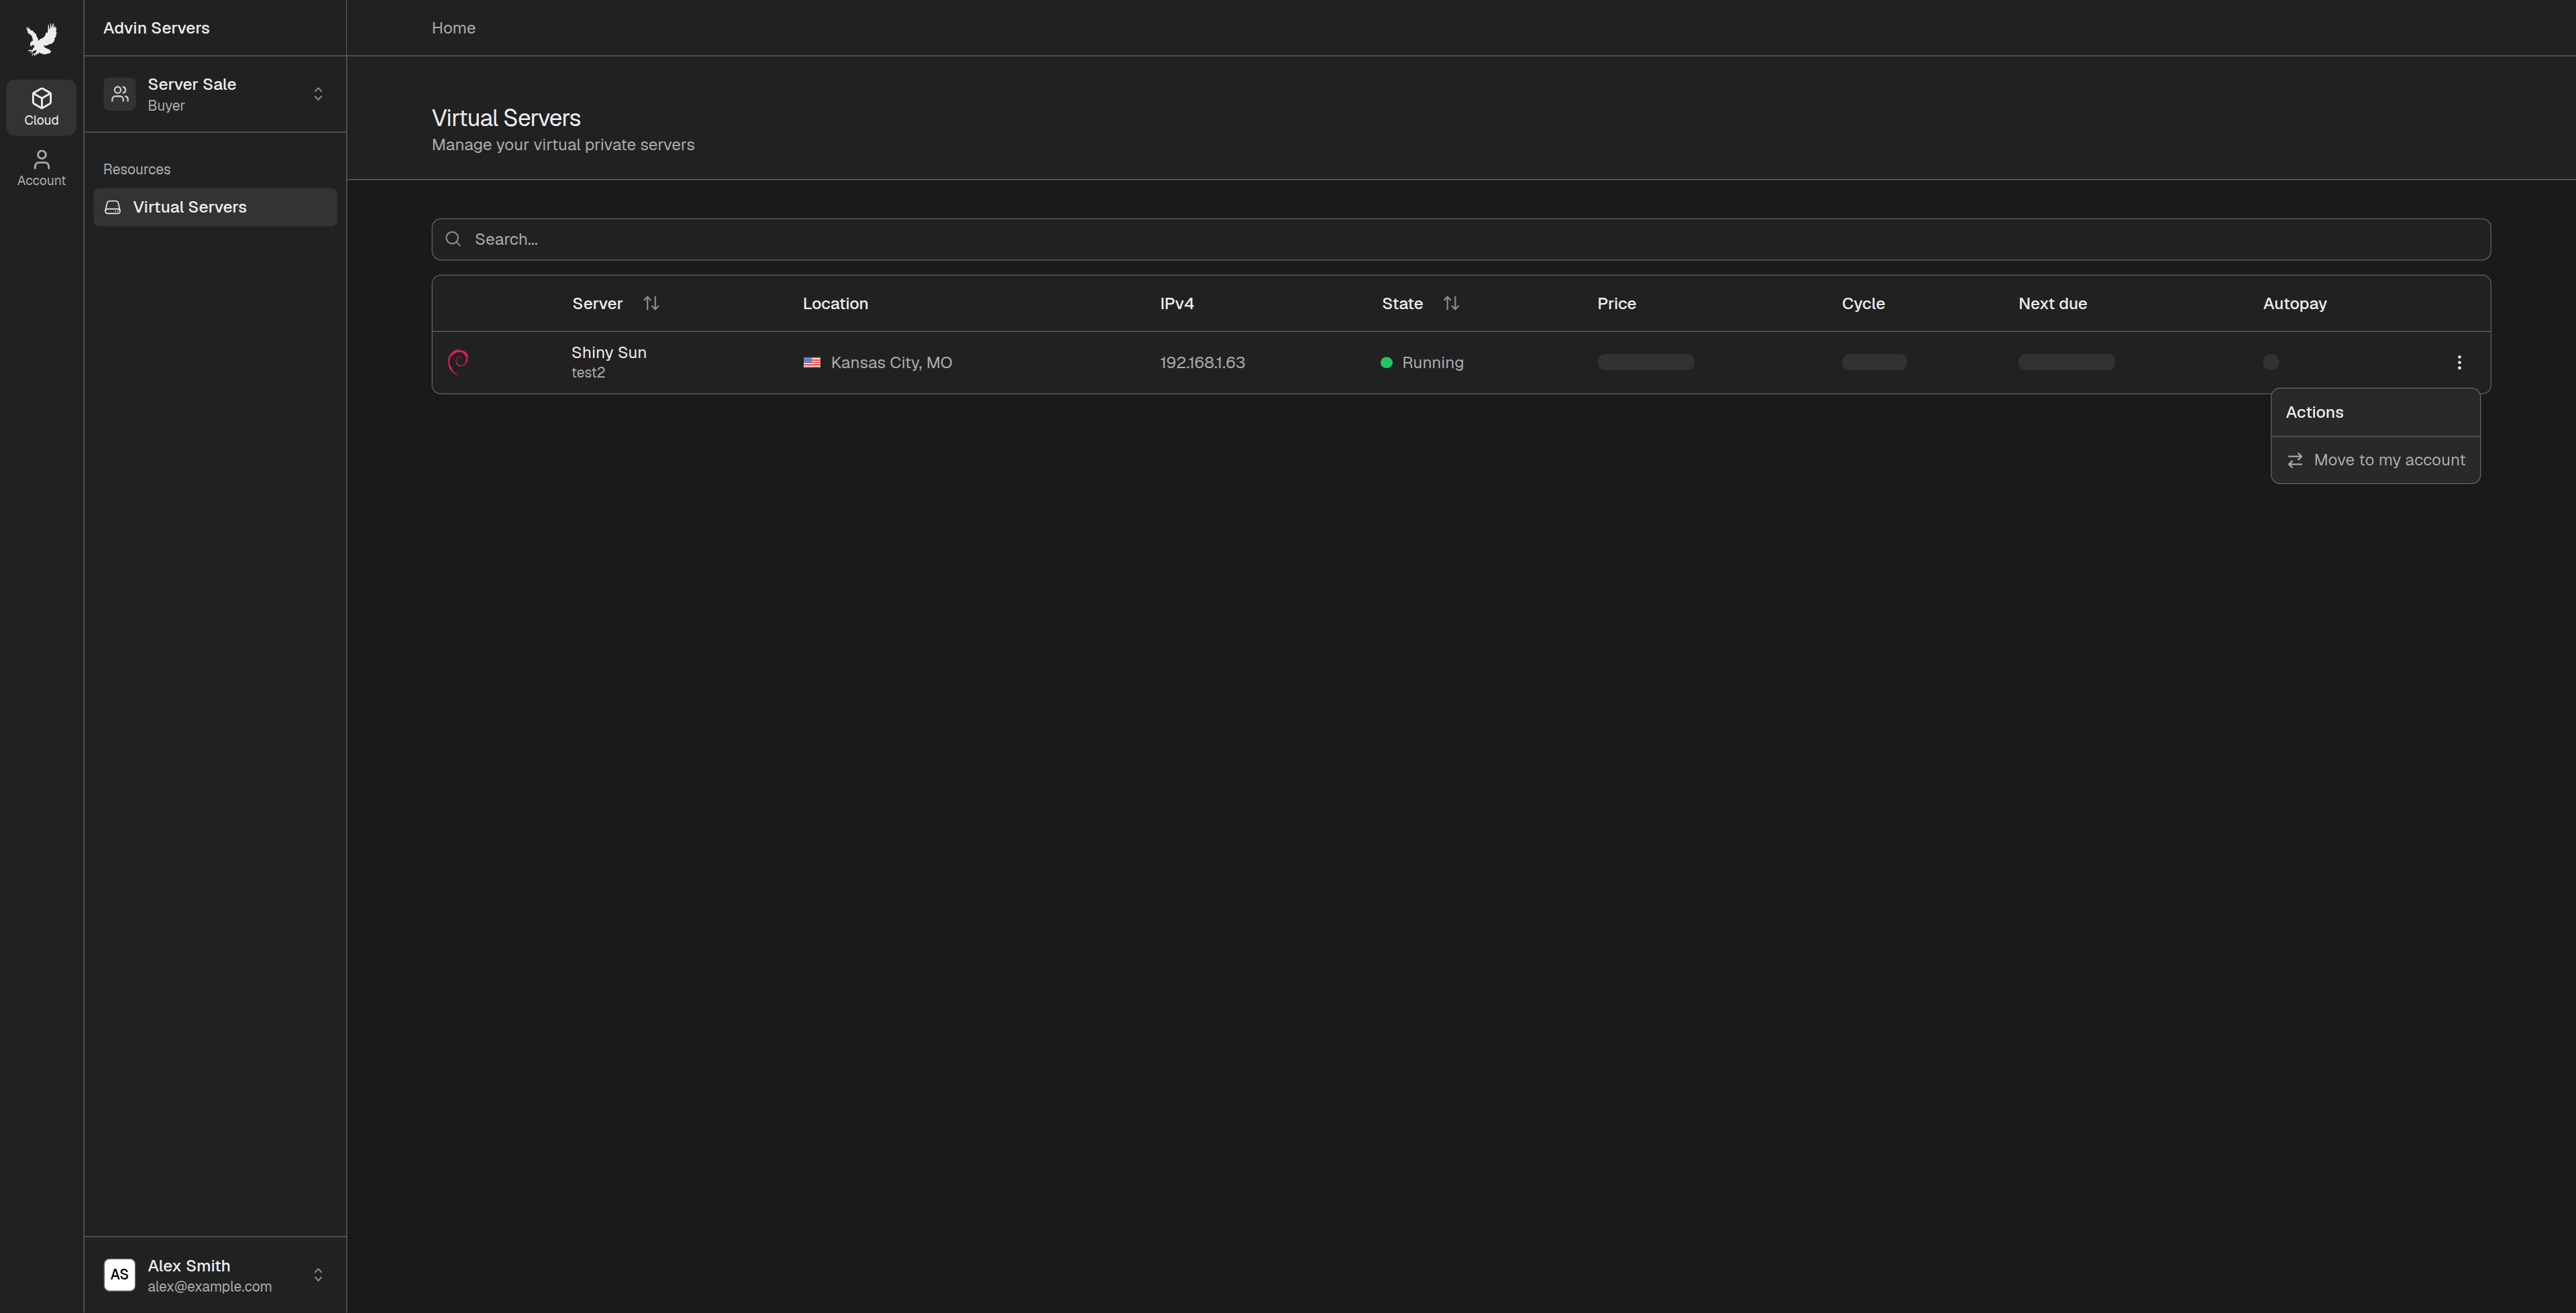
Move to my account (for a server) or Move to team (for a floating IP or snapshot storage).5
Choose where it goes and confirm
The “Move to Your Account” dialog opens. Choose which of your own teams the service should land in.For a server, choose which of its secondary floating IPs come with it. The primary IP addresses always move with the server. Any floating IP you leave unticked is detached and stays with the seller.Click 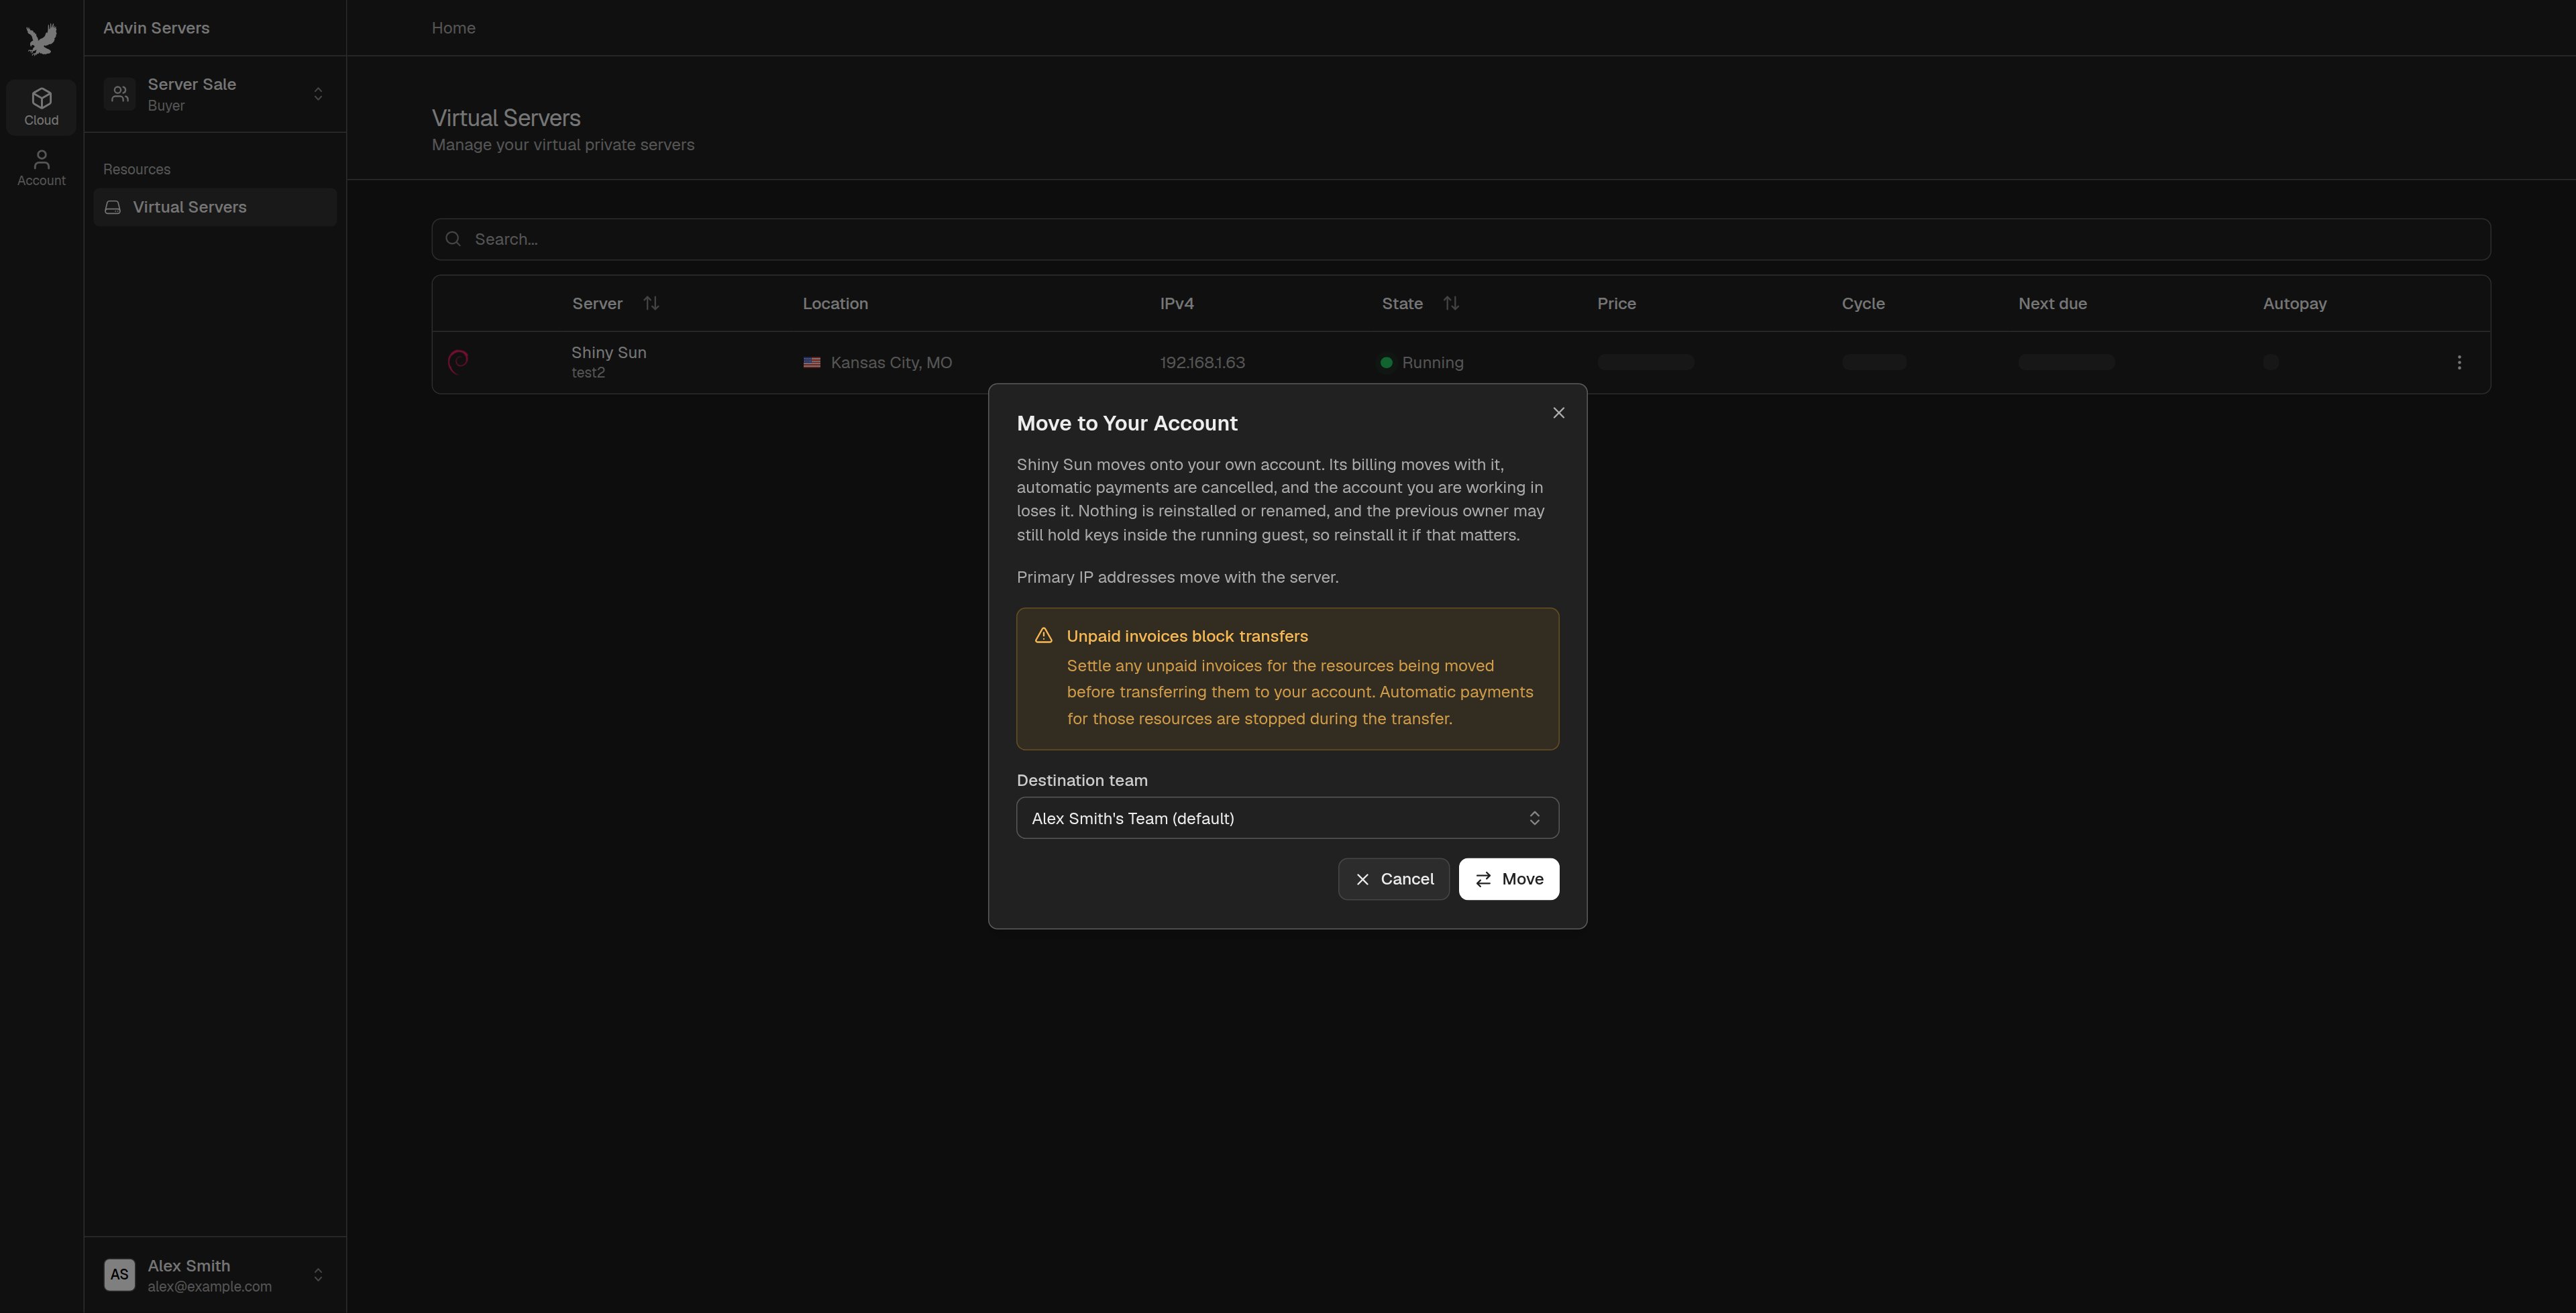
Move. If something is still in the way, the dialog lists it and nothing moves. Ask the seller to fix it and try again.6
Set up the service as your own
The service is now on your account, in the team you picked. Then:
- Set up payment. The service keeps its price, billing cycle and next due date, so nothing is charged when it moves. Automatic payments are cancelled during the transfer, so add your own before the next invoice is due.
- Secure the server. The seller may still have passwords or SSH keys inside the operating system. Reset the root password, or reinstall the server if you want a clean start. A reinstall erases everything on the disk.
- Ask the seller to remove you from their team. You no longer need to be in it.
After the Transfer
FAQ
Is there a fee?
Is there a fee?
No. Transfers made from the console are free. Services the console cannot transfer can be moved by our staff through a support ticket, for a fee. See Service Transfers in our Terms of Service.
Can a transfer be undone?
Can a transfer be undone?
No. The new owner can hand it back the same way, by inviting the seller to one of their teams.
Can the seller cancel after inviting the buyer?
Can the seller cancel after inviting the buyer?
Yes, up until the buyer moves the service. Withdraw the invitation, or remove the buyer from the team.
Does the server restart or change IP address?
Does the server restart or change IP address?
No. It keeps running, and keeps its IP addresses and hostname.
Can I transfer several servers at once?
Can I transfer several servers at once?
No. Each server, floating IP or snapshot storage is moved on its own.
The buyer does not see the Move option
The buyer does not see the Move option
Check that the buyer is in the team that holds the service, and that their role includes the transfer permission for that kind of service. The buyer must also be working in the seller’s team, not one of their own.